Today I have a fan card to share with you. I wanted to make one of these cards for awhile now but all I could find were cards that were 5″ x 7″ and I was looking for a regular 4 1/4″ x 5 1/2″ card. I did eventually find one but it only had one layer and of course I wanted two layers and couldn’t find one. So I modified the card to have the two layers. It may not be exact, but I think its pretty close.
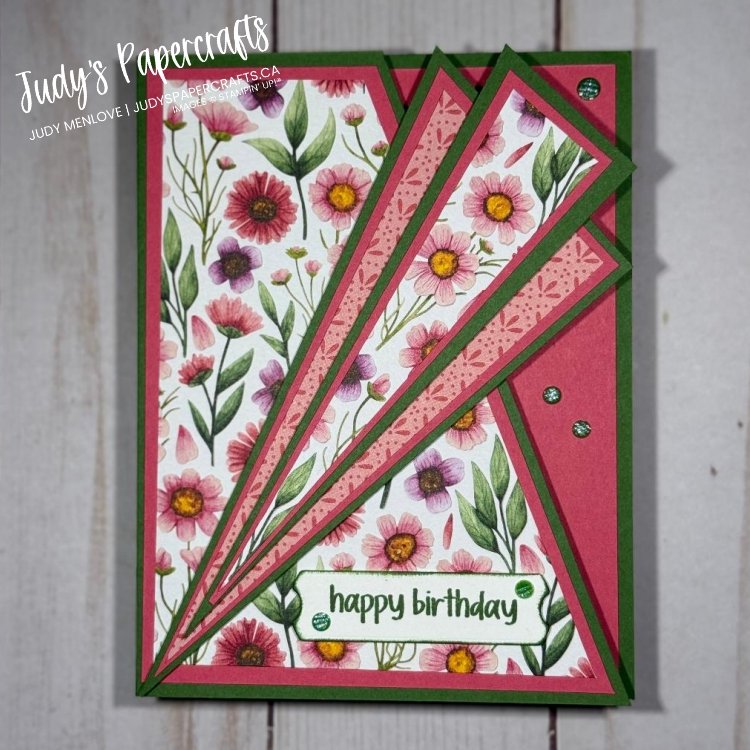
This was such a fun card to make. I started with a base in Garden Green, 8 1/2″ x 5 1/2″, scored at 4 1/4″.
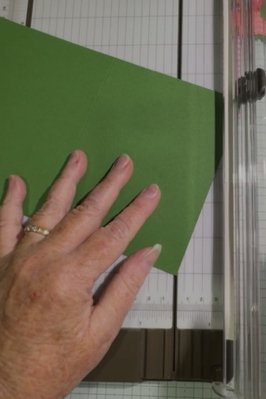
Line up score line on trimmer at 4 1/4″ and mark with pencil at 2 1/8″. Line up the pencil mark in the cutting groove and the bottom right edge in the cutting groove and cut diagonally.
The first layer is Strawberry Slush, 4″ x 5 1/4″. Line up left side at 4″ and mark with pencil at 2″. Then just like I did with the Garden Green, line up the 2″ mark and cut diagonally to the bottom right corner. Glue to card base.
For the second layer, I used a piece of DSP from the Floral Impressions which is an online exclusive product. This piece measured 3 3/4″ x 5″. Line up the left side at 3 3/4″ and mark at 2″. Again, line up the 2″ mark and cut diagonally to the bottom right corner. Glue to card base.
Now its time to start creating the fans. For all the pieces here, you are going to place the top left corner and the bottom right corner in the cutting groove and cut diagonally. Use either all the pieces on the right side or all the pieces on the left side so they match up. The large fan is Garden Green, 2 1/2″ x 5 1/2″. Strawberry Slush is 2 1/4″ x 5 1/4″. The DSP is again from the Floral Impressions and measures 2″ x 5″. Glue layers together making sure that the glue is all the way down to the tips.
The smaller one is Garden Green 1 1/2″ x 5 1/2″. Strawberry Slush is 1 1/4″ x 5 1/4″, you also need to cut 1/4″ off top. Then the DSP that measures 1″ x 5″, again you need to cut 1/4″ off top. Glue pieces together.
Cut a piece in Strawberry Slush 4″ x 5 1/4″ and adhere to the inside of the card. Cut a piece of Basic White that measures 3 3/4″ x 5″. Line up on trimmer at 3 3/4″, mark with pencil at 1 3/4″ and cut diagonally from the 1 3/4″ mark to the bottom right edge. Stamp sentiment (I used one from the new Paper Tags stamp set) and then adhere to inside of card.
Add the large fan to the card with dimensionals and then add the smaller fan with dimensionals. (see photo of card for placement.)
I added a sentiment on the front of the card with dimensionals (mine is from the Attention Shoppers stamp set, die cut with an Unbounded Love die, and I added some ink around the outer edges with a dauber).
To finish the card off, I added some Garden Green embellishments from the discontinued Earth Tones Shimmer Gems.
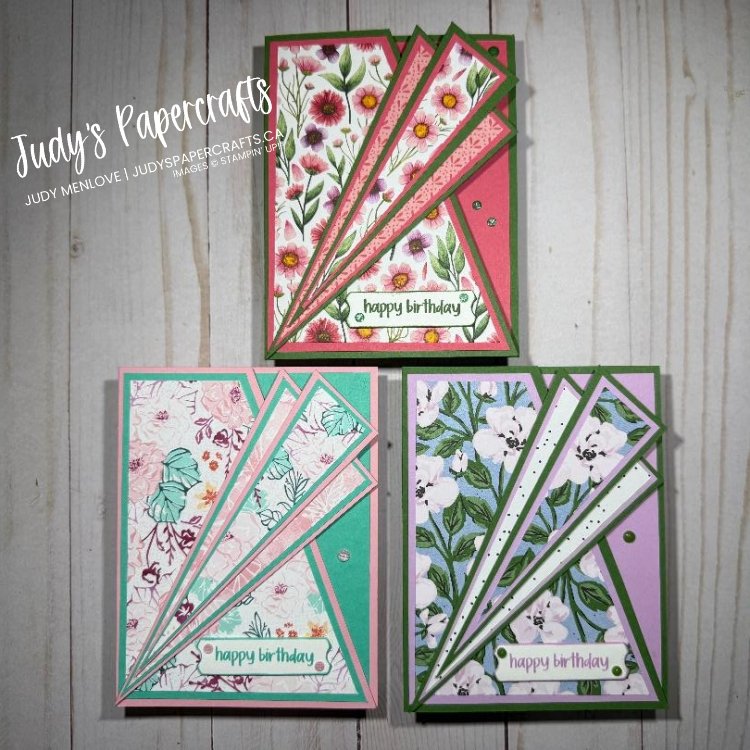
Here’s my card along with a couple of others I made. The DSP used on my other two cards is Unbounded Beauty on one and Lovely Garden on the other one.
Reading this I know the card sounds very confusing but it was actually quite simple to make. If you’re still confused, watch my video as it explains it better. Thanks for dropping by and I hope you enjoyed my card.
Shop the supplies for today’s card in my Canadian Online Stampin’ Up! Store. Just click on the product you want.
Product List![Paper Trimmer [ 152392 ]](https://assets1.tamsnetwork.com/images/EC042017NF/152392s.jpg "Paper Trimmer [ 152392 ]")
![Garden Green 8-1/2" X 11" Cardstock [ 102584 ]](https://assets1.tamsnetwork.com/images/EC042017NF/102584s.jpg "Garden Green 8-1/2\" X 11\" Cardstock [ 102584 ]")
![Strawberry Slush 8 1/2" X 11" Cardstock [ 165625 ]](https://assets1.tamsnetwork.com/images/EC042017NF/165625s.jpg "Strawberry Slush 8 1/2\" X 11\" Cardstock [ 165625 ]")
![Floral Impressions 12" X 12" (30.5 X 30.5 Cm) Designer Series Paper [ 165603 ]](https://assets1.tamsnetwork.com/images/EC042017NF/165603s.jpg "Floral Impressions 12\" X 12\" (30.5 X 30.5 Cm) Designer Series Paper [ 165603 ]")
![Stampin' Dimensionals [ 104430 ]](https://assets1.tamsnetwork.com/images/EC042017NF/104430s.jpg "Stampin' Dimensionals [ 104430 ]")
![Mini Stampin' Dimensionals [ 144108 ]](https://assets1.tamsnetwork.com/images/EC042017NF/144108s.jpg "Mini Stampin' Dimensionals [ 144108 ]")
![Multipurpose Liquid Glue [ 110755 ]](https://assets1.tamsnetwork.com/images/EC042017NF/110755s.jpg "Multipurpose Liquid Glue [ 110755 ]")
![Basic White 8 1/2" X 11" Cardstock [ 166780 ]](https://assets1.tamsnetwork.com/images/EC042017NF/166780s.jpg "Basic White 8 1/2\" X 11\" Cardstock [ 166780 ]")
![Paper Tags Cling Stamp Set (English) [ 165454 ]](https://assets1.tamsnetwork.com/images/EC042017NF/165454s.jpg "Paper Tags Cling Stamp Set (English) [ 165454 ]")
![Strawberry Slush Classic Stampin' Pad [ 165286 ]](https://assets1.tamsnetwork.com/images/EC042017NF/165286s.jpg "Strawberry Slush Classic Stampin' Pad [ 165286 ]")
![Attention Shoppers Photopolymer Stamp Set (English) [ 163640 ]](https://assets1.tamsnetwork.com/images/EC042017NF/163640s.jpg "Attention Shoppers Photopolymer Stamp Set (English) [ 163640 ]")
![Unbounded Love Dies [ 163383 ]](https://assets1.tamsnetwork.com/images/EC042017NF/163383s.jpg "Unbounded Love Dies [ 163383 ]")
![Garden Green Classic Stampin' Pad [ 147089 ]](https://assets1.tamsnetwork.com/images/EC042017NF/147089s.jpg "Garden Green Classic Stampin' Pad [ 147089 ]")
![Sponge Daubers [ 133773 ]](https://assets1.tamsnetwork.com/images/EC042017NF/133773s.jpg "Sponge Daubers [ 133773 ]")
![Earth Tones Shimmer Gems [ 164070 ]](https://assets1.tamsnetwork.com/images/EC042017NF/164070s.jpg "Earth Tones Shimmer Gems [ 164070 ]")

Leave a Reply